This is a story about Habits! Ever since the lockdown began because of the pandemic I felt a greater need to connect with friends over activities and keep each other motivated and most of all united!
This is an attempt at solving it. One stop-shop to track everything along with friends. I recorded a small clip (< 2.5 mins) to show a glimpse of the features and to showcase the UX of the app.
I wanted to make this app for a long time now and this hackathon was the perfect opportunity to do it!
serverless
Being a front-end engineer I wanted to use my existing web-dev skills to get the backend of the app up and running without actually building it :P. That's where AWS Amplify enters, it's a full-fledged framework to build apps and host it on the cloud with AWS's managed services.
Before this hackathon started, I had no real experience of using Amplify framework. So I wanted to get a feel of how it works, its basic architecture before signing up for the hackathon.
when it comes to learning I prefer books, so I picked up Full Stack Serverless
I started feeling confident and learnt the basic models of serverless architecture along with a lot of AWS and Amplify's terminology.
tech stack
| tech | use |
| react-native | app |
| amplify cognito | social authentication (Google only for now) |
| dynamodb | database |
| lambda functions | to read/write to dynamo db |
| pinpoint | push notifications |
database design
I invested a lot of time to come up with the best strategy to design my schema as I wanted to scale this app for a lot of users. It would not only be essential for the performance of queries but also with the cost incurred too.
Coming from a relational schema background my initial instinct was to normalize the entities and store them up in separate tables.
relational model
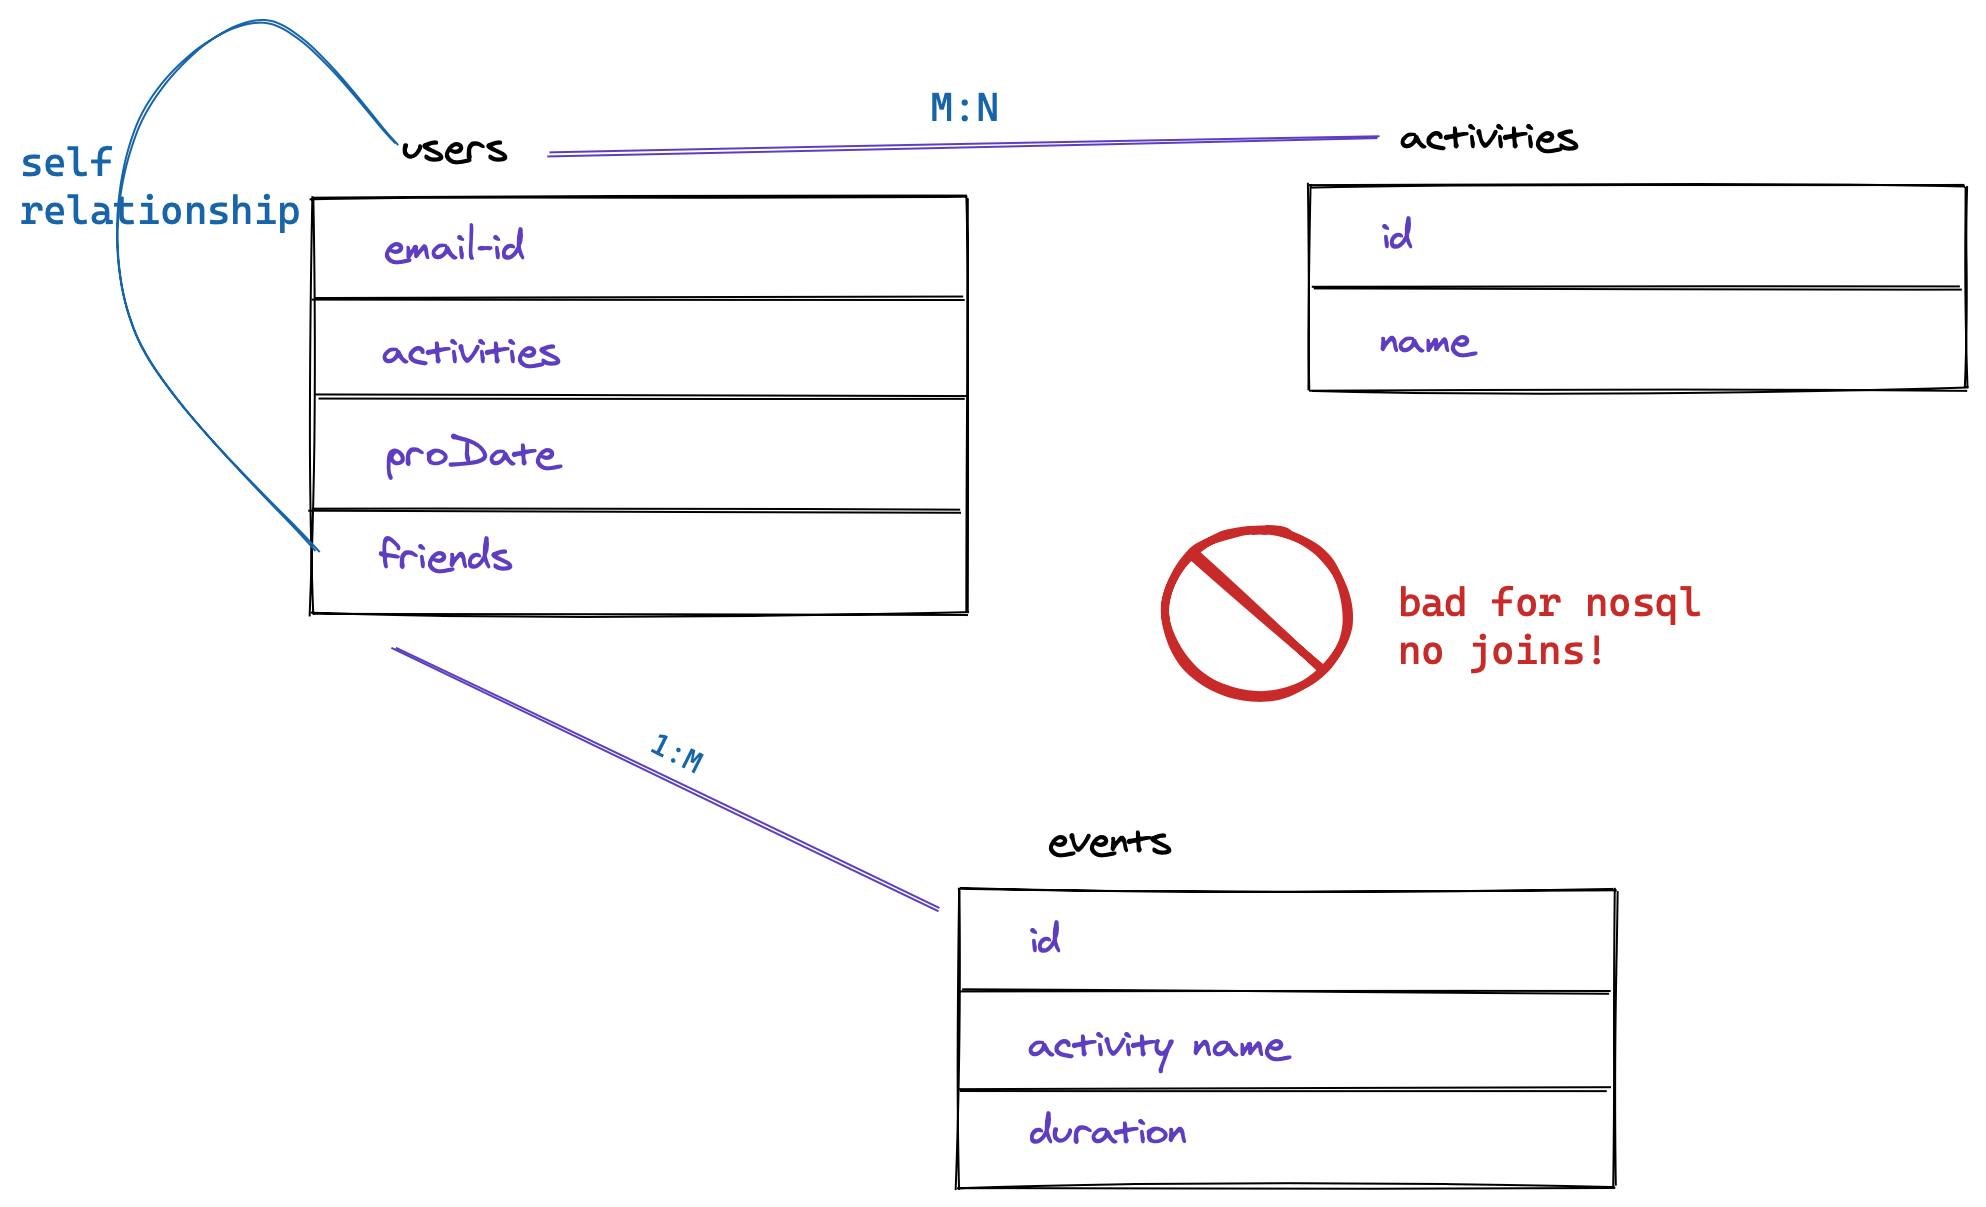
Any nosql database performs the best if there are no joins to be done, which means all of your data should preferrably reside in the same table. Just like a relational table has a construct called primary key which is used to uniquely identify a record, DynamoDB also has a similar construct. In DynamoDB the primary key is made up of two keys
- partition key (
pk) - sort key (
sk)
These both act as a composite key and help in getting faster and cheaper access to the intended records.
Using these two keys to store multiple entities in the same table was totally 🤯 when I first learned about it!
things needed to render the data in our app
- user profile data (which includes activities and friends)
- activity events
nosql design
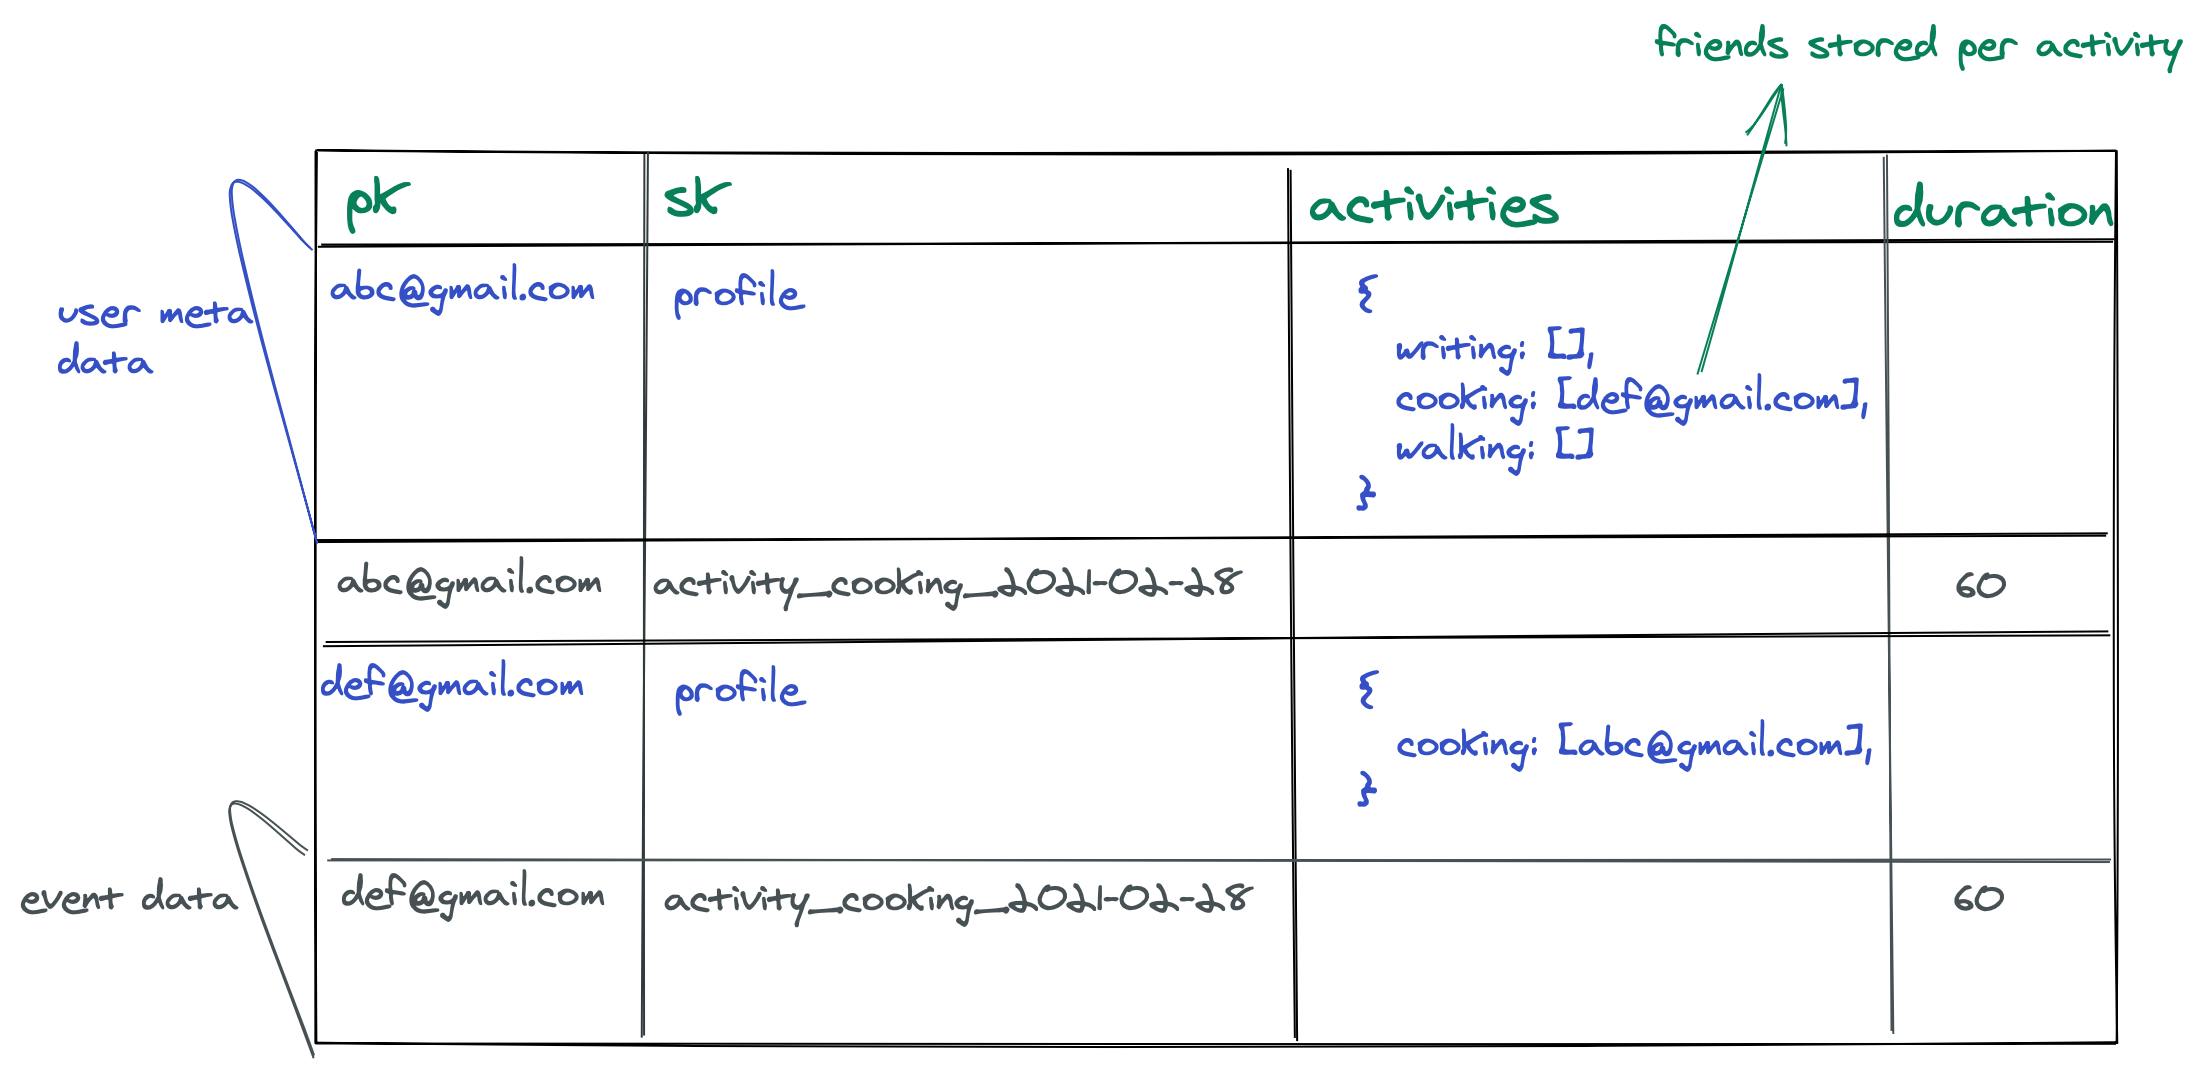
You can see a single table contains two types of data (marked in different colors) that I mentioned above. Since Dynamo DB is a nosql database, it doesn't complain if the rows have different attributes. It only makes partition key and sort key to be compulsary and unique.
This access pattern can fetch the intended data using DynamoDB query.
DynamoDB has two major read APIs,
QueryandScan.
- Query takes in partition key and sort key and returns the rows matched costing only for the rows returned.
- Scan takes a filter criteria like
whenclause in aSQLbut reads entire table and returns rows matching the filter. This type of query should be avoided at all costs as this bills you for the number of rows scanned, i.e. entire table. Imagine having 1 million rows?
dynamodb optimized queries
profile information
pk  = email
sk  = 'profile'
events of a user by type=walking
pk = email
sk `BEGINS_WITH` activity_walking
events type=walking for the current month
pk = email
sk `BEGINS_WITH` activity_walking_2021_02
As shown above I've used sk intelligently by concatening the different values like string activity followed by activity name followed by iso timestamp to be able to query efficiently using DynamoDB's conditon attributes
accessing this database
Now that the database is sorted, it's time to access this from the app. I used AWS Amplify's api gateway to have a single entrypoint for all the apis. Each api was implemented as a lambda function.
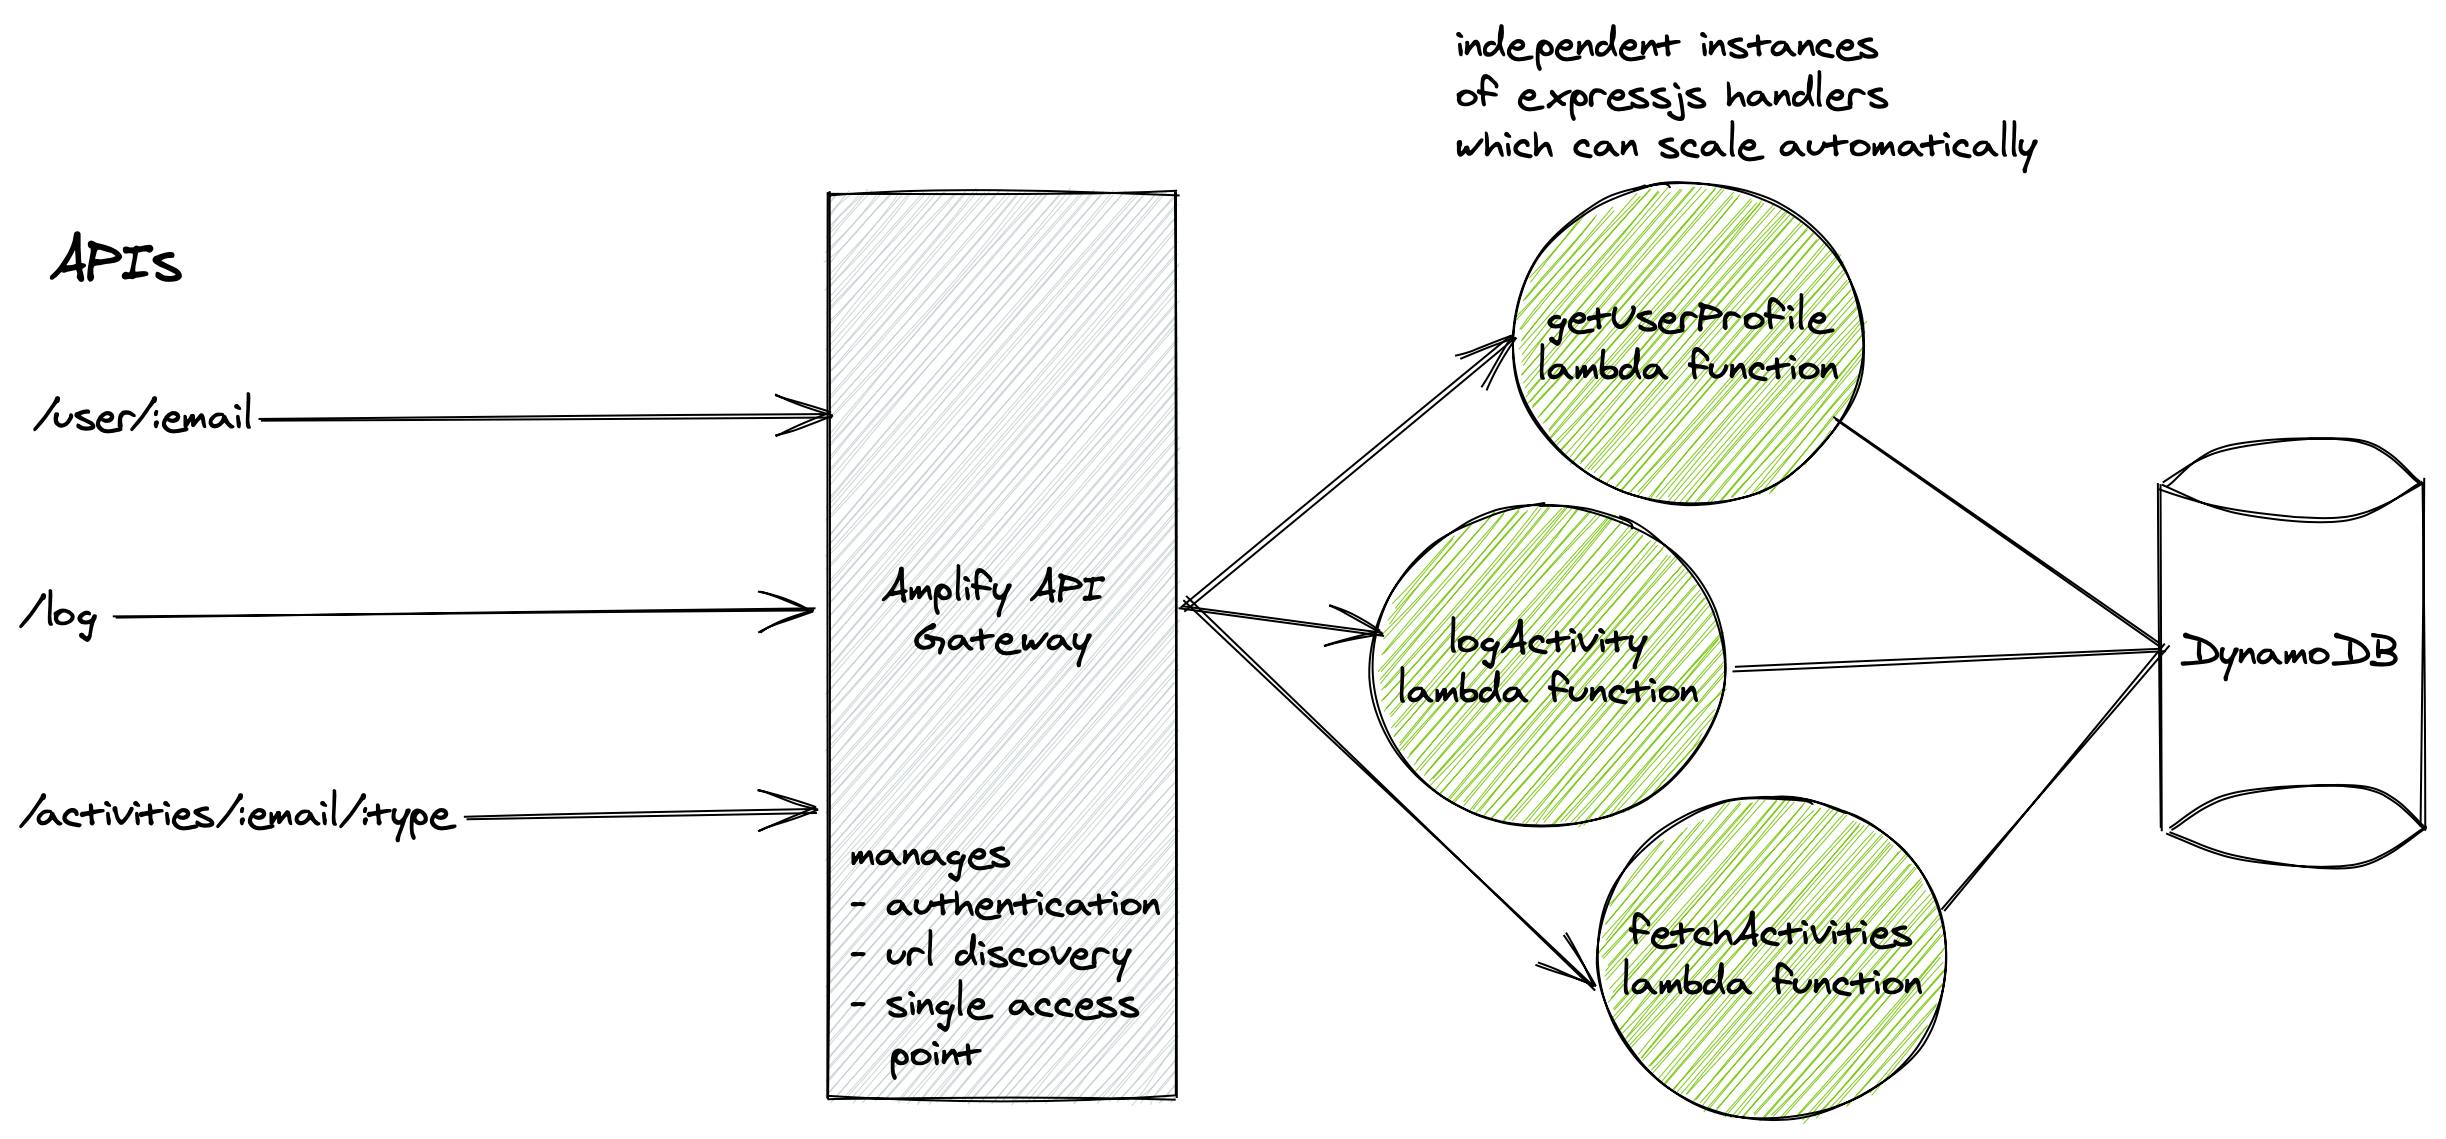
api gateway
Amplify has this service which lets you define endpoints and also specify the implementation which then gets deployed to cloud. Amplify's API sdk manages the authentication and URL resolution based on the environment type automatically for you.
You can add api resource using the Amplify CLI command
amplify add api
The documentation is comprehensive and I was able to follow it to make it work. The CLI to add API automatically asks you not only the type REST or GraphQL but also the implementation backend like a lambda function.
Based on the options you select, AWS Amplify will add resources in your codebase.
Infrastructure as code: Amplify auto-generates config and backend code files in your codebase Using this you can spawn or tear down an enviroment in minutes without having to run anything on your local machine. Cloud first from the beginning :)
lambdas
Lambdas sit at the core of the backend service and do the actual talking with the Database of services needed to get data for the app.
Each of the lamda file is auto-generated from the Amplify CLI which gives you a boilerplate and you're free to change and deploy it.
When using Lambdas make sure the authorization configurations are properly setup otherwise lambda function won't be able to talk to DynamoDB. You can check this by doing
amplify update functionand following the CLI options to provide or remove permissions on resources.
Example lambda code to access DynamoDB.
using the API in client code
AWS Amplify makes using APIs a breeze with its client
import API from '@aws-amplify/api';

const records = await API.get(apiName, path, {body})

// apiName => name of the api gateway created
front-end
I used react-native to spin up my app using the typescript template. I used react-navigation v5 to add routing to my app. The docs for both of these are praiseworthy :)
The app has three screens in total.
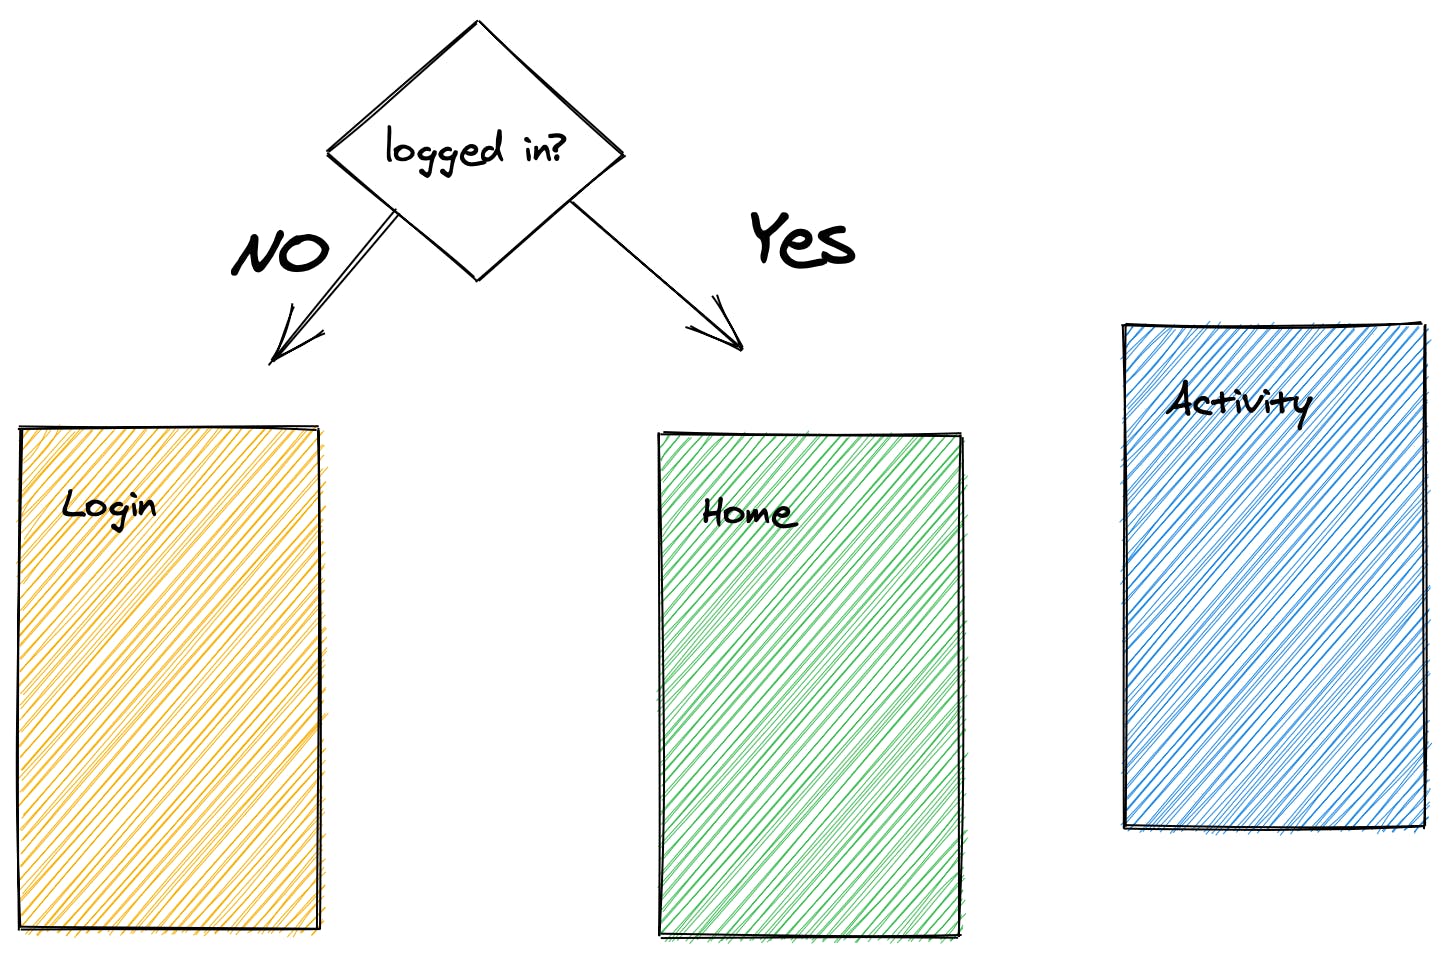
Using react-navigations declarative routes, one can define what should be shown if the user is logged-in or when logged-out. I also added the deep-linking feature to open the app if someone sent an invite to join a friend for an activity!
  <NavigationContainer
      linking={{
        prefixes: ['activitytracker://'],
        config: {
          screens: {
            Home: 'share/:activity/:userId',
          },
        },
      }}>
      <Stack.Navigator>
        {email ? (
          <>
            <Stack.Screen name="Home">
              {(props) => <Home {...props} email={email} />}
            </Stack.Screen>
            <Stack.Screen
              name="Activity"
              component={Activity}
            ></Stack.Screen>
          </>
        ) : (
          <Stack.Screen
            name="Splash"
            component={Splash}
            options={{title: 'The Hobbit Hole'}}
          />
        )}
      </Stack.Navigator>
    </NavigationContainer>
authentication
Since I wanted the login experience to be extremely frictionless I used social login using Amplify's Cognito service. This simplifies the user flow as there's no sign-up/sign-in.
To save time I used Amplify's utilities to do the login. Amplify exposes withOAuth higher-order component which you can wrap your parent component with.
import {withOAuth} from 'aws-amplify-react-native';

const Splash = withOAuth((props) => {
  const {oAuthUser, googleSignIn} = props;
  const email = oAuthUser?.attributes?.email;

  return (
    <View>
      <Text>Your component goes here</Text>
      <Button onPress={props.googleSignIn} title="Google Sign-In"/>
    </View>
  );
});
Since my entire database design hinges around the email of the user, the withOAuth component passes it conveniently. It also gives various signIn, signOut functions which you can add to the component without worrying about the token/redirections.
I've linked the code repository below. The above snippet only shows how to use the authentication component for brevity.
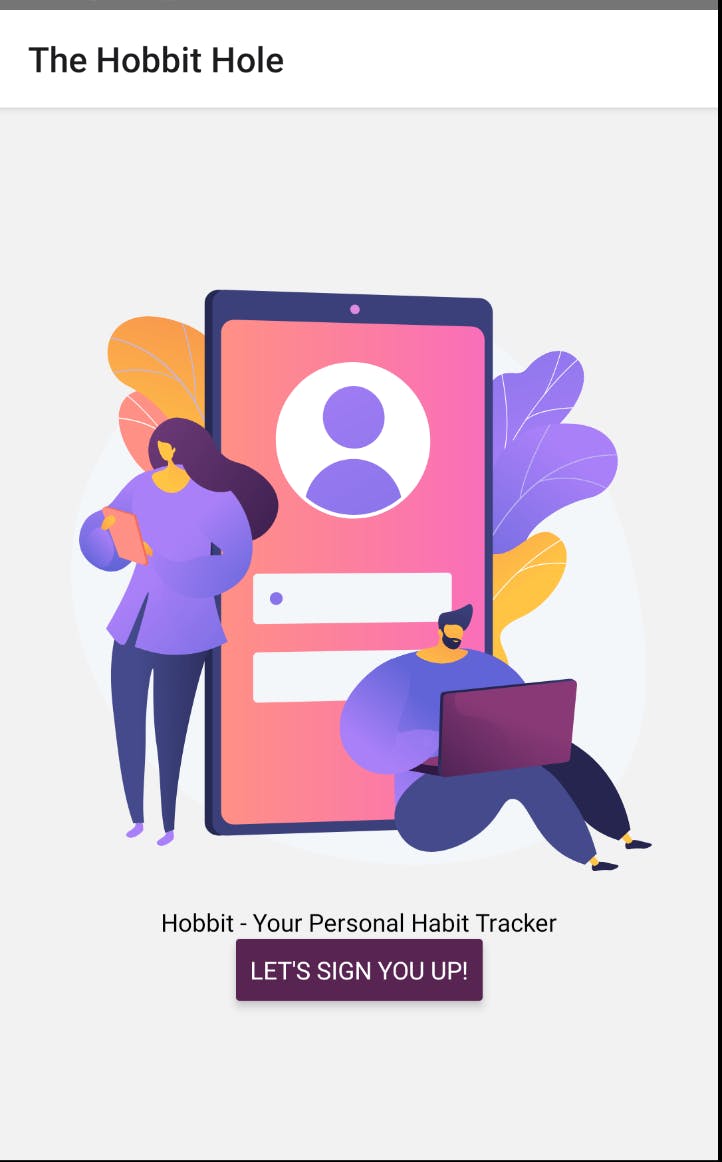
login screen with Google sign-in
animations
If you looked at the highlight video of the app linked at the top, each of the screen has a subtle animation in it to make the experience more engaging. I used Lottie to add personalized animations.
state management - zustand
I always wanted to try out the minimalistic but powerful zustand. With its consice and hooks-like api made it fun to work with.
You can define multiple stores and read from each with memoized selectors so that the component renders only when there's a change on which it's dependent on.
The set/get utilities work wonderfully and you can even do async stuff in your functions. This helped me to abstract the API layer in my app and only deal with state which internally interfaced with api.
I used to two stores to manage the state of the app.
- user store
- activity log store
The former stores the user meta info, like the activites/friends and the later stores the event log.
streaks and activity calendar
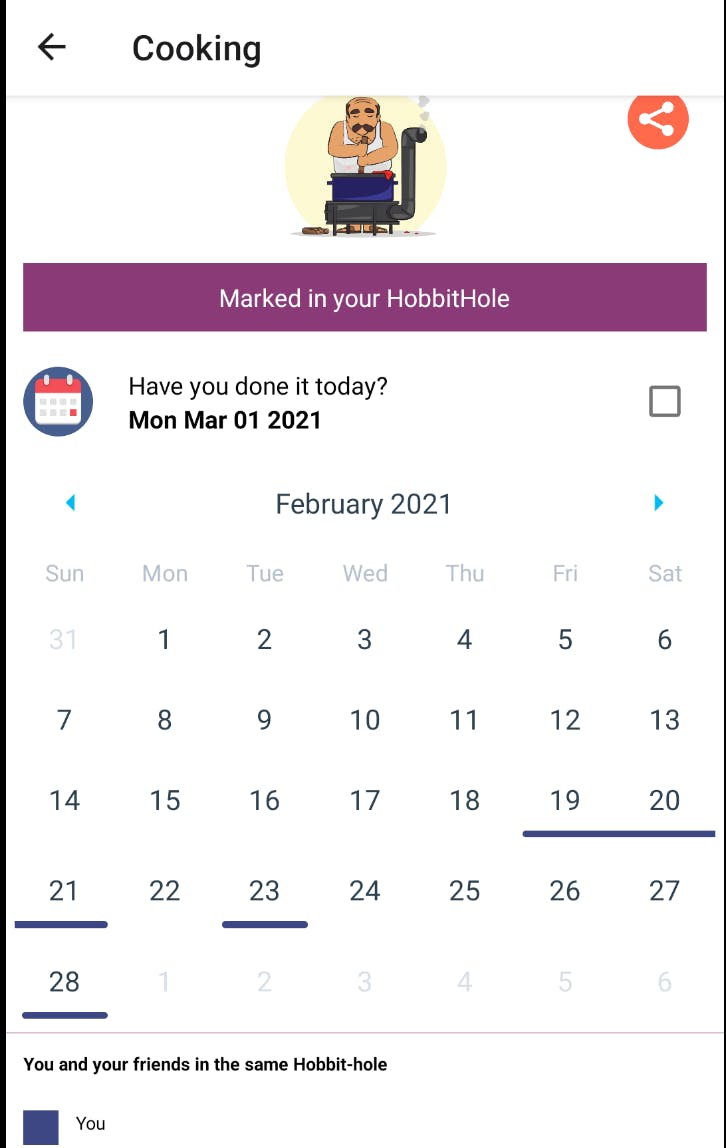
I used react-native-calendars to mark the streaks and active days of the user. The calendar component takes in a prop to show all the marked dates in this form
<Calendar
  markedDates={{
    '2017-12-14': {
      periods: [
        {startingDay: false, endingDay: true, color: '#5f9ea0'},
        {startingDay: false, endingDay: true, color: '#ffa500'},
        {startingDay: true, endingDay: false, color: '#f0e68c'}
      ]
    },
    '2017-12-15': {
      periods: [
        {startingDay: true, endingDay: false, color: '#ffa500'},
        {color: 'transparent'},
        {startingDay: false, endingDay: false, color: '#f0e68c'}
      ]
    }
  }}
  // Date marking style [simple/period/multi-dot/custom]. Default = 'simple'
  markingType='multi-period'
/>
It took some amount of work to get the activities of the user and generate this format. Once I made it work for one user, I called it multiple times to generate the object for each of the friends too, and then flattened all the objects mixing the periods key to highlight multiple users in the same calendar. I extracted the util out to make it more reasonable.
closing thoughts
- After working with the serverless technologies my interest and confidence is piqued now
- I can now look at things from a product standpoint and not worry about building the backend.
- I really liked the concept of lambda functions which can scale independenly based on the api. The aggregated logs in
CloudWatchportal made debugging very convenient. Not running all the backend on my local laptop was definitely a plus! - The only thing that I wasn't able to finish end-to-end was integration of PushNotifications.
- I faced a lot of friction in integrating and working with device-endpoints/address
- I learned after spending a lot of time to attach user with an endpoint automatically so that I won't have to store the endpoints manually in the Database
- but triggering notifications from a lambda trigger didn't work as expected as the
Pinpointservice'ssendUsersMessageskept on throwing that the user has opted out of all notifications.
source code
Please find the source code here: github.com/ankeetmaini/ActivityTracker
next steps
I'll publish this on the app store and make it more attractive by adding features like custom activity addition.